Distal perimesorectal dissection
Mathieu D’Hondt
Mohammed Abu Hilal
Distal Dorsal plane
After a 360° full thickness dissection through the rectal wal, dissection must be performed at a markedly caudal angle to account for the steep angle between the anal canal and posterior levator ani muscle, created by the puborectalis sling and dense adherence of the rectum to Waldeyer’s fascia and the anococcygeal ligament.
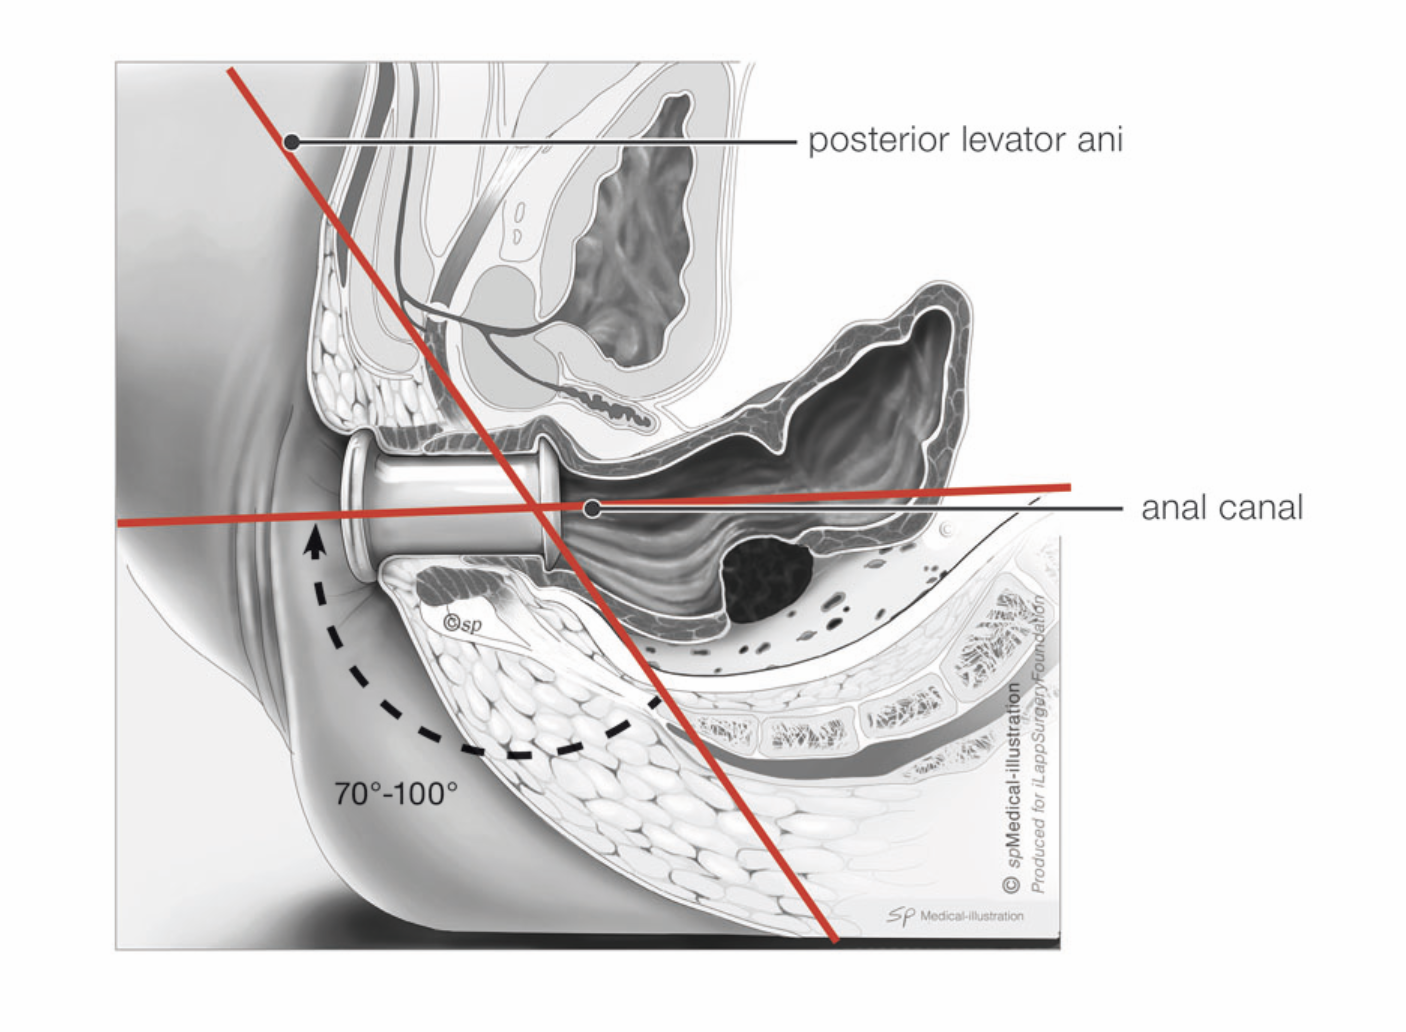
Although there is no clear advantage in measuring the exact angle, recognition on preoperative MRI helps to appreciate the steep posterior turn needed at the onset of the procedure.
As in the traditional top-down approach, the presacral space is the safest area to start the bottom-up mesorectal dissection in the beginning of the experience. This posterior avascular plane also helps to guide the surgeon towards the more difficult lateral dissection.
For the dissection a few steps are essential:
- the surgeon has to lift up the specimen with a grasper to find the right posterior plane; when dissecting too close to the pursestring suture one has the risk of coning into the specimen from below
- starting directly at 6 o’clock must be avoided because of the dense adhesions of the anococcygeal ligament. It’s better to start at 5 or 7 o’clock
- the posterior dissection should be stopped when 4 and 8 o’clock are reached
Initial dissection must be performed at a markedly caudal angle. The mesorectum is falling posteriorly into the concavity of the sacrum.
In most male patients, the pelvic floor is tight around the rectum and therefore the muscle layers of the pelvic floor have to be followed upward to localise the correct plane. This is actually the anatomic coning of the rectal mesentery, seen from below. In some patients this NON TME plane extends for several cm before the “holy plane” is reached.
Distal Anterior plane
When the rectal wall is incised full thickness from the beginning, the pneumorectum works more efficiently and the rectoprostatic or rectovaginal plane is easier to find.
In female patients, it is useful to repeatedly confirm the rectovaginal plane by palpating the vagina. In male patients, great care must be taken to prevent dissecting into the prostate or even urethra. If the surgeon has any doubt about the location of the prostate he can remove the Gelpoint Cap and perform a digital exam through the access channel.
By gently pushing against the tissues, there is a more efficient use of the pneumorectum and in most instances the plane will reveal itself.
For the dissection a few steps are essential:
_ the surgeon has to pull down the specimen with a grasper to find the right anterior plane; this is an avascular plane so when bleeding appears the dissection is performed too close to the vagina/prostate
_ starting directly at 12 o’clock must be avoided because of dense adhesions in this location, and also due to the proximity of the urethra in male patients. It’s better to start at 1 or 11 o’clock
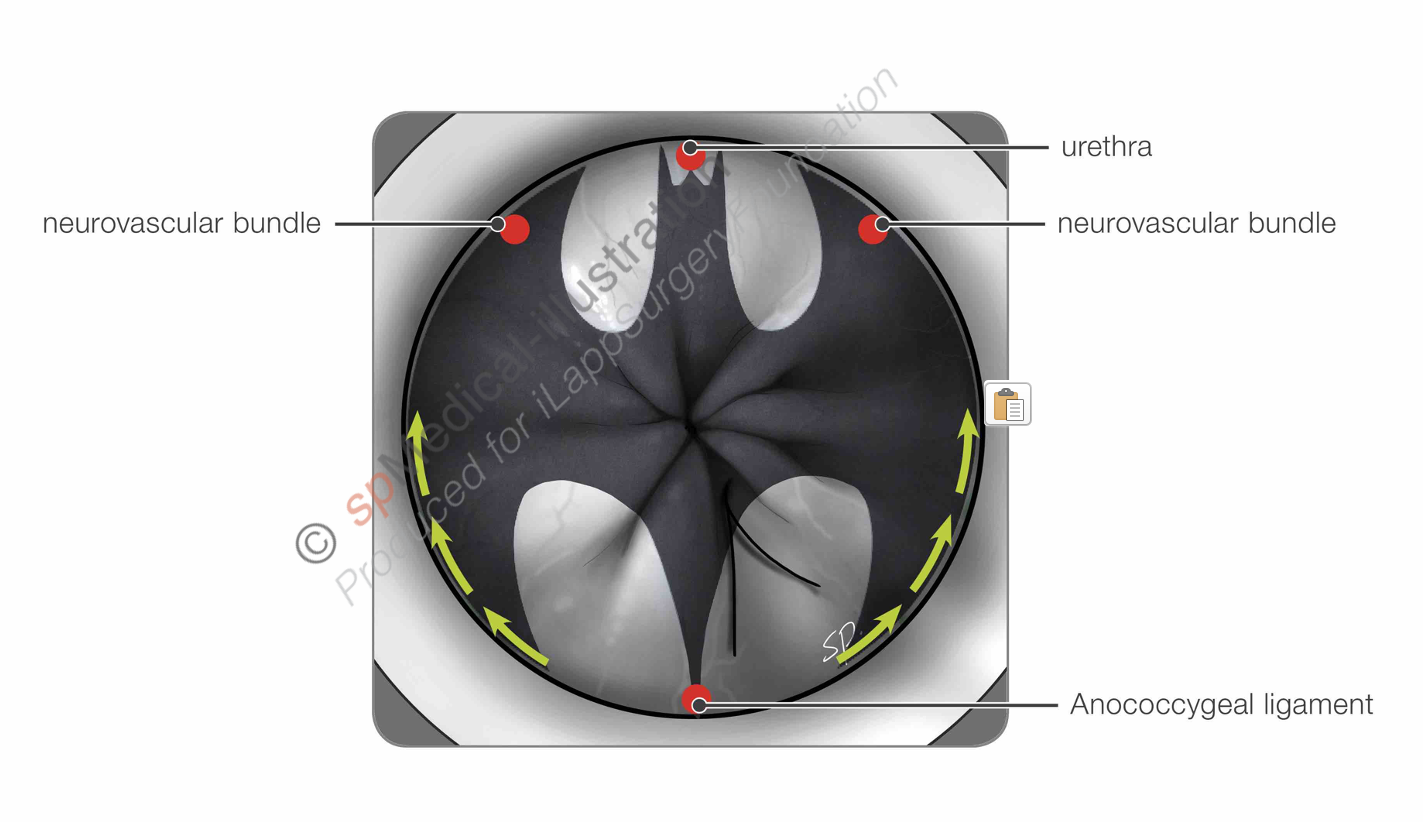
_ the anterior dissection should be stopped when coming close to 2 and 10 o’clock to avoid early entry into the area of the neurovascular bundles
- use of an electric hook is preferred over an energy device
Once the smooth surface of the prostate is identified, a dissection towards the midline can be performed with appropriate visualization to avoid injury to the urethra.
Distal Lateral plane
After completing the first part of posterior and anterior dissection, the lateral sides remain attached and have a kind of a batman-shape.
It’s important to connect the planes that are already dissected because that way the specimen is freed up in a cylindrical way and the pressure of the pneumorectum can work more efficiently. This approach also avoids leaving the specimen attached at any single side, which is then much more difficult to dissect.
In the learning curve of this technique it’s very tempting to take out all the yellow tissue because that seems to be the mesorectum. The side wall is also covered with a shiny, yellow fascial layer so one has to be careful of damaging structures in that area especially nerves and blood vessels.
For this dissection a few steps are essential:
- when the surgeon pulls the specimen to one side, the opposite lateral side wall is put on tension. If done excessively, this may contribute to dissecting too far laterally.
- when dissection on the lateral side shows bare muscle (like a sushi salmon) you are definitely TOO deep and peeling off important structures
- if you are lost, always go back to the posterior side to orientate and look at the curved course of the pelvic floor (see green arrows in batman-illustration)
- respect the symmetrical way we are built in embryological development: dissection on the left and right side will be comparable
The sequence of a posterior, anterior and lateral dissection is repeated following the TME plane in a cylindrical fashion.
Signs of warning:
- Coning into the specimen from below has to be avoided at all time. A donut or O-sign means that dissection is performed in the wrong plane
- Pulling on the specimen means pulling on the side wall

- Muscle on any side means that dissection is performed too deep; for example on posterior side